
Complete Setup Guide
Learn how to connect your HubSpot account and configure the Linear integration to streamline your development workflow and customer support processes.
Table of Contents
Installation & Configuration
Cautions & Best Practices
Review these important considerations before enabling ticket creation flows that originate in Linear.
Avoid Duplicate Ticket Creation
Enable Ticket Creation from Linear Issues only if you do not plan to create HubSpot tickets from the App Card or workflow automations. Running multiple ticket creation paths in parallel can result in duplicate HubSpot tickets for the same Linear issue.
Status Mapping Is Required
When ticket creation is initiated from Linear, make sure Status Mapping is fully configured in your Linear settings so that issue updates translate correctly to HubSpot ticket stages.
Default Team Selection
A Default Team must be selected in Linear before enabling this workflow. Without a default team, Linear cannot determine where to place new issues created during ticket synchronization.
Integration Overview
The Linear-HubSpot integration provides three powerful ways to connect your project management and customer support workflows:
App Card
Interactive card in HubSpot tickets for managing Linear issues
- View Linear issue details
- Create new issues from tickets
- Update status and assignees
Workflow Actions
Automated Linear issue creation through HubSpot workflows
- Trigger on ticket events
- Custom field mapping
- Conditional logic
Webhook Sync
Real-time bidirectional synchronization
- Status updates
- Comment synchronization
- Assignee changes
Prerequisites
Before installing the integration, ensure you have the following:
HubSpot Requirements
- HubSpot Professional or Enterprise account
Required for workflow automation features
- Admin or Super Admin permissions
Needed to install apps and configure workflows
- Service Hub or Sales Hub
For ticket management capabilities
Linear Requirements
- Linear workspace with API access
Standard or higher plan recommended
- Workspace admin permissions
To create OAuth apps and configure webhooks
- Teams and projects set up
For proper issue organization
Step 1: Connect Your HubSpot Account
To integrate Linear with your HubSpot account, please follow these steps:
Step 1: Go to the signup to begin setup process.
Go to SignupStep 2: After submission you will be redirected to HubSpot to authorize the app.
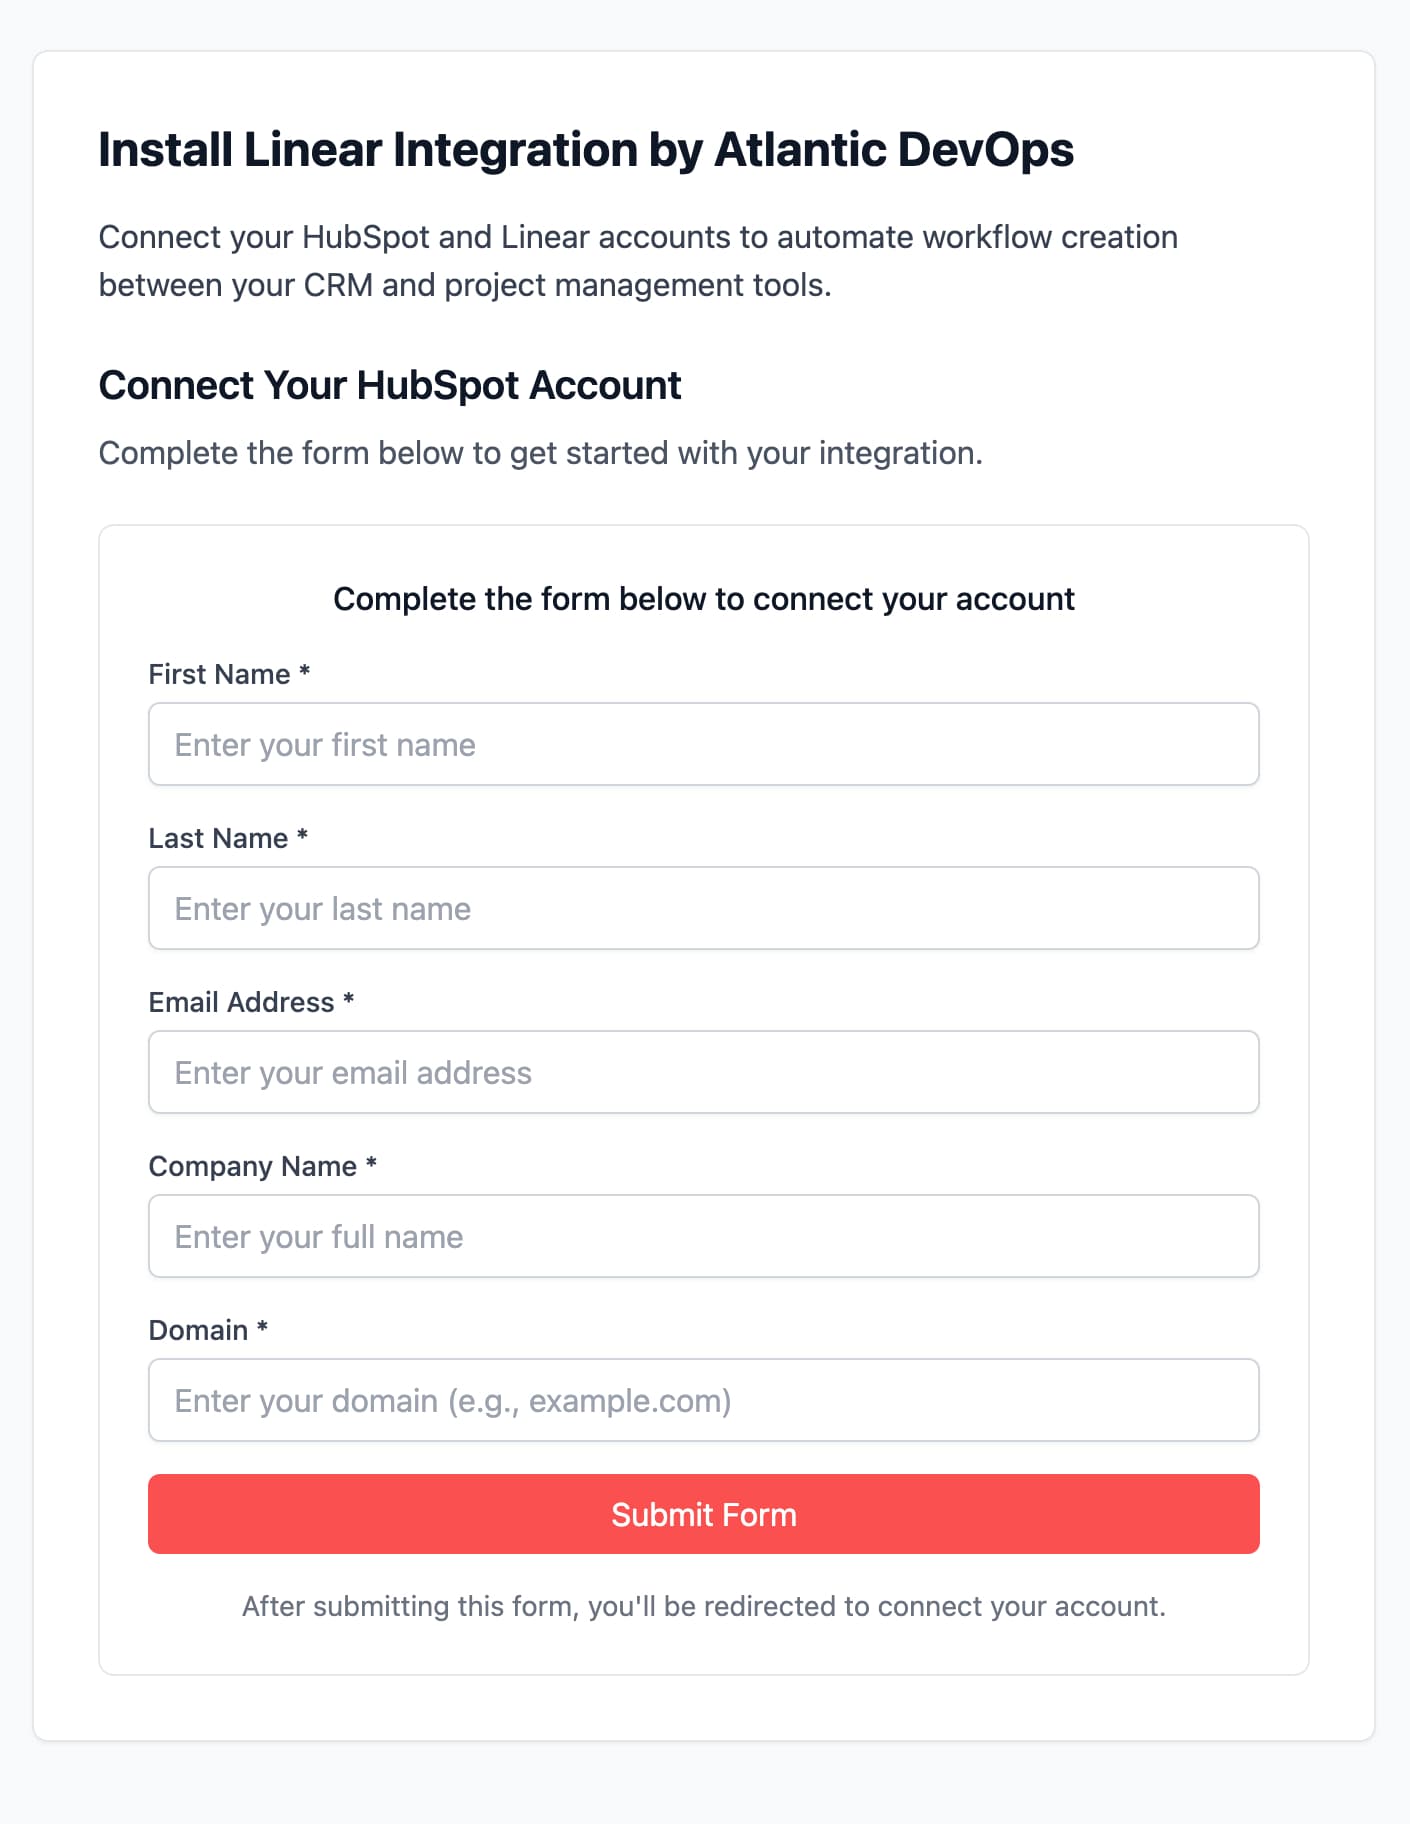
Step 3: Enter your HubSpot credentials and hit "Login."
Step 4: Click on the "choose account" button to give the app access to your account.
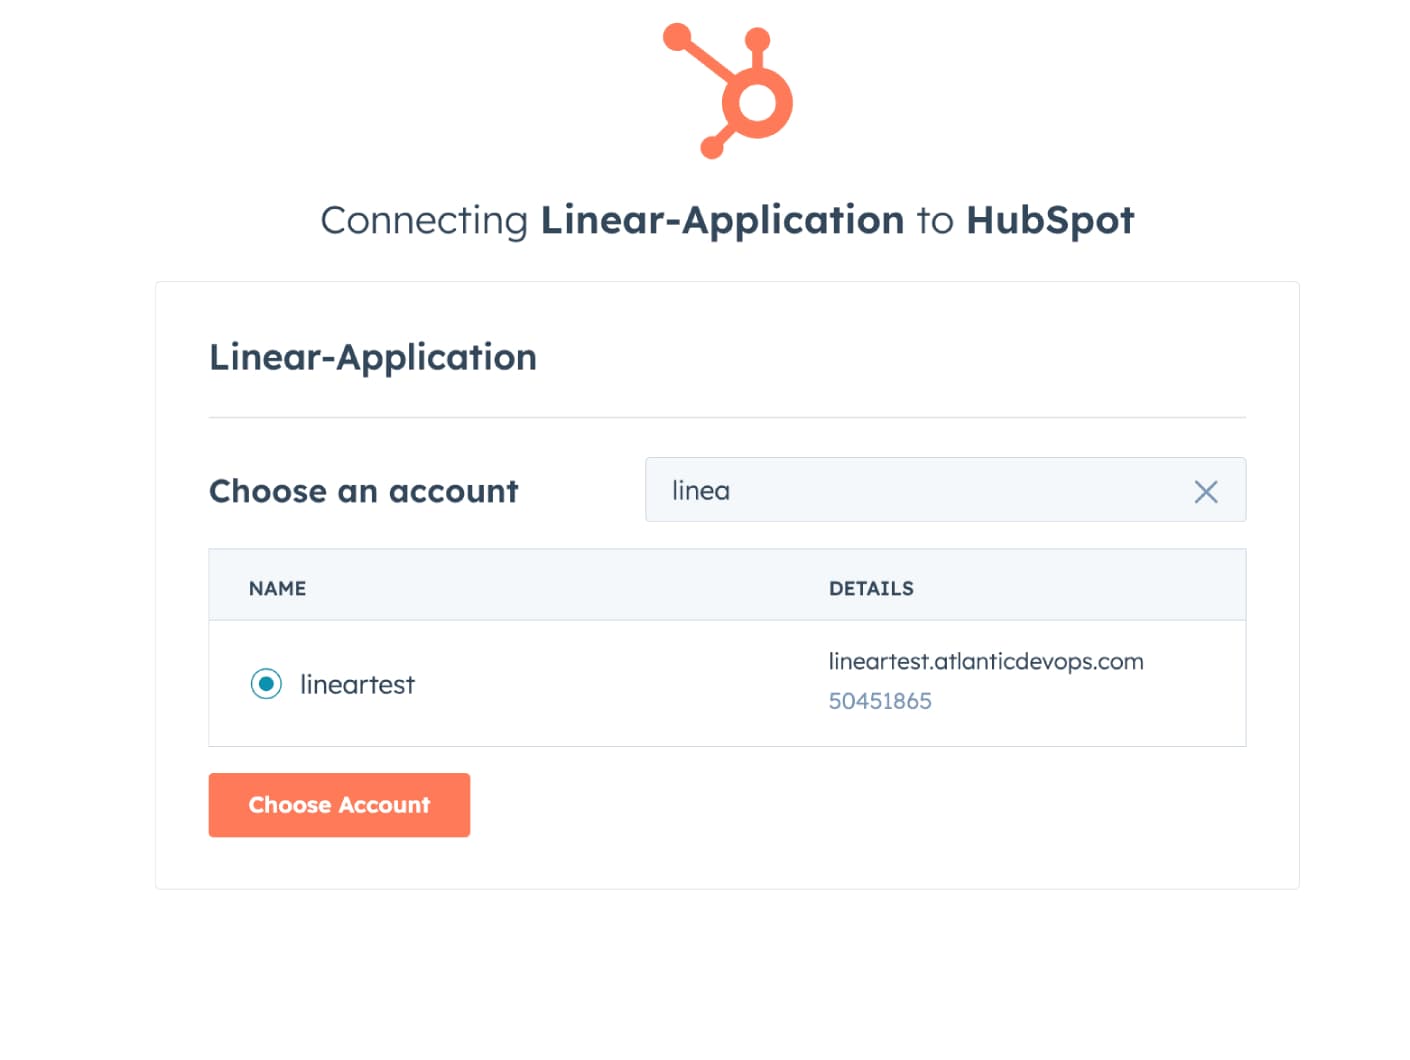
Step 5: Grant the required permissions to complete the connection.
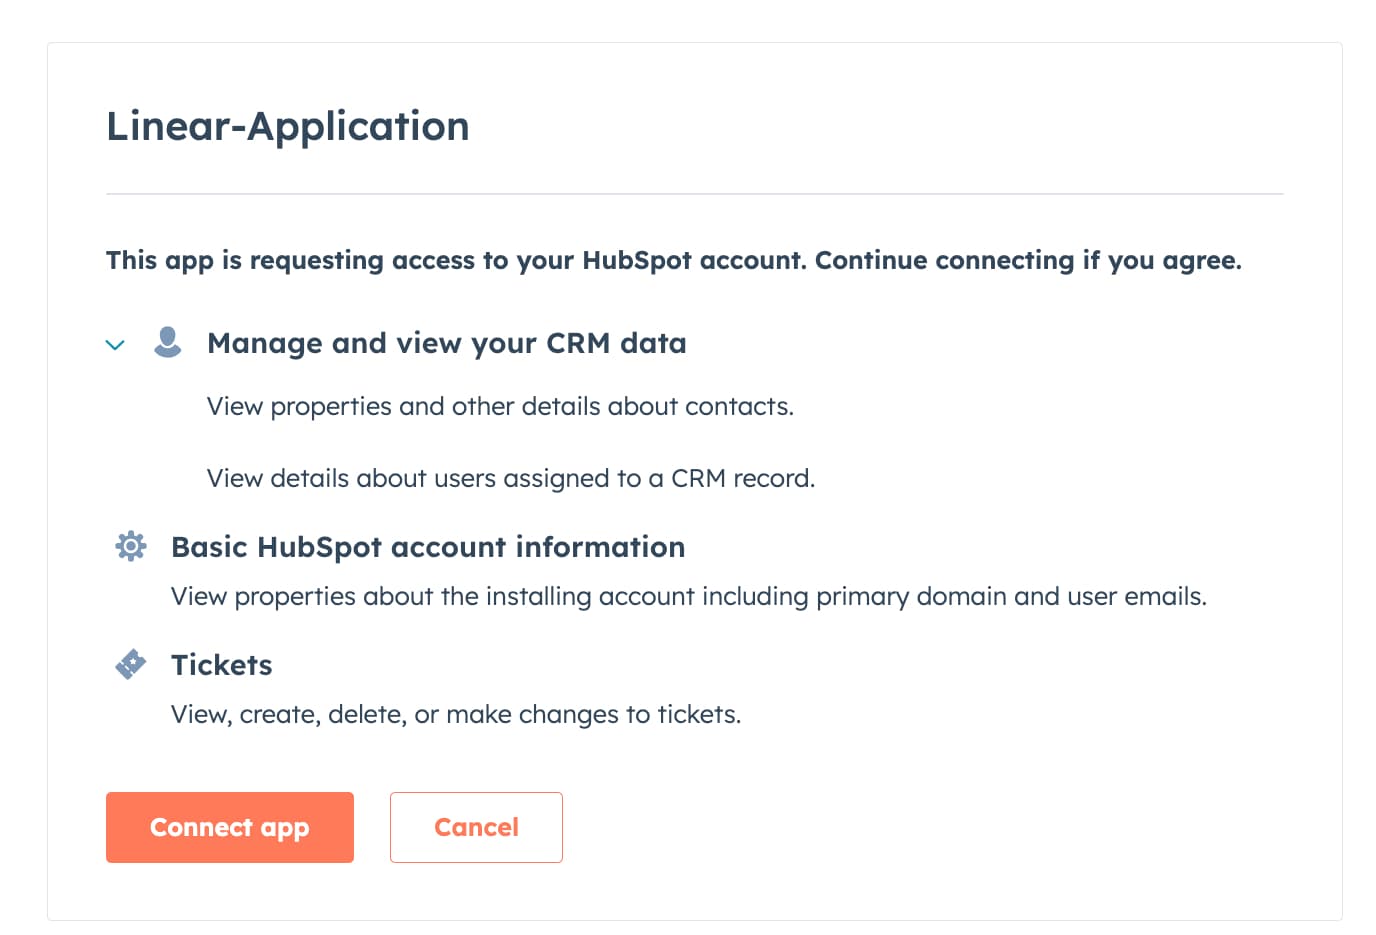
After completing these steps, you will be redirected to the Setup Dashboard, where you can continue configuring the integration.
Required HubSpot Permissions
The integration requires the following permissions:
- • tickets - Read and write access to support tickets
- • crm.objects.owners.read - Access to user information
- • oauth - OAuth token management
- • automation - Workflow automation capabilities
Uninstall
To uninstall the integration from your HubSpot account, follow the instructions in this HubSpot Knowledge Base article.
Step 2: Connect Your Linear Workspace
Now connect your Linear workspace to create issues from HubSpot tickets.
Linear Connection Process
HubSpot Connected
After completing the HubSpot connection, you'll automatically proceed to the Linear connection step.
Click Connect Linear
Click "Connect Linear Workspace" to start the Linear OAuth process.
Authorize Linear Access
You'll be redirected to Linear to authorize the integration. Grant access to your workspace.
What we'll access:
- • Your Linear workspace
- • Teams and projects
- • Issue creation permissions
- • Issue status updates
- • Comment synchronization
Important: Workspace Limitation
Each Linear workspace can only be connected to one HubSpot portal at a time. If you try to connect a workspace that's already connected to another portal, you'll receive an error message with details about the existing connection.
Step 3: Choose Your Plan
Select a plan to continue using the integration after your trial period.
Linear Connected!
Your Linear workspace is ready for integration.
Choose Your Preferred Plan
Monthly Plan
Yearly Plan
Free Trial Information
- • 14-day free trial - No payment required during trial period
- • Cancel anytime - No commitment, cancel your subscription at any time
- • Full access - All features available during the trial period
Payment Process
Select Plan
Choose between monthly ($29/month) or yearly ($299/year) plan.
Secure Payment
Complete payment through Stripe's secure checkout process.
Start Trial
Begin your 14-day free trial immediately after payment setup.
Step 4: Complete Setup
After payment setup, complete the integration configuration and start using your Linear-HubSpot integration.
Payment Completed!
Your subscription is now active and you can proceed to complete the setup.
Configure Your Settings
In HubSpot, go to Settings → Integrations → Connected Apps and open the Linear app. For what each setting does, see the Settings Reference.
Step 5: App Card Configuration
Set up the Linear Issue Converter card in your HubSpot tickets for interactive issue management.
Card Features
Issue Creation
Create new Linear issues directly from HubSpot tickets
Issue Linking
Link existing Linear issues to tickets
Status Updates
Update issue status and assignees
Real-time Sync
Automatic synchronization of changes
Team Selection
Choose which Linear team to assign issues to
Project Assignment
Assign issues to specific projects
Card Setup Process
Automatic Installation
The Linear Issue Converter card is automatically installed when you connect your HubSpot portal.
Card Visibility
The card appears in the "Apps" tab of your HubSpot tickets, accessible to users with appropriate permissions.
User Permissions
Ensure your team members have access to the app and appropriate ticket permissions to use the card.
Step 6: Workflow Actions Setup
Set up automated Linear issue creation through HubSpot workflows for hands-free ticket processing.
Workflow Action Registration
Navigate to Workflow Setup
Go to the workflow setup page in your dashboard to register the custom action.
Register Action
Click "Register Action" to create the "Create Linear Issue" custom workflow action in your HubSpot account.
Create Workflow
In HubSpot, create a new workflow and add the "Create Linear Issue" action to automate issue creation.
Workflow Configuration
Recommended Workflow Setup
Trigger
"Ticket created" or "Ticket property changed"
Condition (Optional)
Filter by ticket category, priority, or other properties
Action
"Create Linear Issue" with configured title, description, and priority
Action Parameters
Configure the following parameters when setting up the workflow action:
| Parameter | Description | Example |
|---|---|---|
| Title | Issue title (can use ticket properties) | {{ticket.subject}} |
| Description | Issue description | {{ticket.content}} |
| Team | Linear team assignment | "Engineering" |
| Priority | Issue priority level | "High", "Medium", "Low" |
Step 7: Webhook Configuration
Enable real-time bidirectional synchronization between Linear and HubSpot using webhooks.
Webhook Benefits
Real-time Updates
Instant synchronization of changes
Bidirectional Sync
Changes sync both ways automatically
Comment Sync
Comments sync between platforms
Status Updates
Status changes sync automatically
Assignee Changes
Owner/assignee updates sync
Configurable
Choose what to sync
Webhook Setup Process
Enable in Settings
Go to Linear settings and enable webhook synchronization for your workspace.
Configure Sync Options
Choose which events to sync: status changes, comments, assignee updates, etc.
Test Synchronization
Make test changes in Linear to verify webhook synchronization is working correctly.
Supported Webhook Events
Linear → HubSpot
- • Issue status changes
- • Issue assignee updates
- • Issue comments
- • Issue priority changes
- • Issue label updates
HubSpot → Linear
- • Ticket status changes
- • Ticket owner updates
- • Ticket comments
- • Ticket priority changes
- • Ticket property updates
Step 8 (optional): Enable Company ↔ Customer
INCLUDED IN YOUR PLANCompany ↔ Customer sync is included in your plan. It links each HubSpot company to its Linear customer, so requests from that company show up under the right customer in Linear.
Open the Linear app settings in HubSpot, go to the Customers tab, and turn on Company → Customer Sync. Each option on that tab is explained in the Settings Reference.
Full Company ↔ Customer setup guideSettings Reference
In HubSpot, go to Settings → Integrations → Connected Apps and open the Linear app. The settings page has five tabs: General Settings, Customers, Linear Settings, Status Mapping, and Account Info.
Each tab has its own save button, and changes only take effect after you save. Refresh reloads your saved settings and is turned off while you have unsaved changes. If a tab shows Finish setup, your Linear workspace isn't connected yet. Click Complete setup to connect it and choose a plan.
General Settings
Controls how tickets and issues are created and kept in sync. Click Save All Settings when you're done.
Enable Ticket Creation
When on, every new HubSpot ticket creates a Linear issue, and every new Linear issue creates a HubSpot ticket. New issues go to the default team and project below.
This can't be on at the same time as the Linear-only mode in the Linear Settings tab. Turning one on turns the other off.
Bidirectional Sync
Keeps linked tickets and issues up to date in both directions. Changes to the title, description, status, or priority in one app update the other.
It works for every linked ticket, including tickets linked from the app card or a workflow, so you can use it without turning on Enable Ticket Creation. Status changes only sync for statuses you map in the Status Mapping tab.
Default Team (required)
Shown when Enable Ticket Creation is on. Issues created from HubSpot tickets are added to this Linear team. You need to pick a team before you can save.
Default Project (optional)
Shown when Enable Ticket Creation is on. Issues created from HubSpot tickets are added to this project. The list shows projects from the selected default team. Choose No default project to leave new issues without a project.
Filter by Teams / Filter by Projects (optional)
Controls which Linear issues create HubSpot tickets. Leave both empty to create tickets for issues from every team and project.
An issue creates a ticket if it belongs to any selected team or any selected project. For example, if you select the Support team and the Billing project, issues from either one create tickets.
Comment Sync
Comments added to a Linear issue appear as notes on the linked HubSpot ticket. Edits and deletions in Linear are reflected too.
Notes added in HubSpot are not copied to Linear. To send a comment from HubSpot to Linear, use the Add Comment to Linear Issue workflow action.
Owner/Assignee Sync
Keeps the HubSpot ticket owner and the Linear issue assignee the same. Assign someone in Linear and they become the ticket owner in HubSpot, and the other way around.
People are matched by email address. If a HubSpot user has no Linear account with the same email (or the other way around), the owner or assignee isn't changed.
How fields match up
| Linear | HubSpot |
|---|---|
| Title | Ticket name |
| Description | Ticket description |
| Assignee | Ticket owner |
| Priority | Priority |
| Status | Ticket status (pipeline stage), based on your Status Mapping |
| Comments | Notes |
Customers
Links HubSpot companies to Linear customers. Included in the $29 plan. On an older plan, this tab shows an upgrade link and the options can't be changed. Click Save Settings when you're done.
Company → Customer Sync
Turns on Company ↔ Customer sync. This enables the Create/Link Linear Customer workflow action and the Linear Customer card on company records. Linear matches a company to a customer by its domain.
The other options on this tab appear once this is on.
Sync customers back to companies
When a customer is created or changed in Linear, the linked HubSpot company is updated. If no company is linked yet, a new one is created.
Field mapping
Shown when Sync customers back to companies is on. Choose which HubSpot company property each Linear customer field syncs with. The mapping applies in both directions. Choose Don't sync to skip a field.
- Linear Name: default is Company name.
- Linear Domains: default is Company domain name.
- Linear Revenue: default is Annual revenue. Only number properties can be chosen.
- Linear Size: default is Number of employees. Only number properties can be chosen.
Linear Settings
For teams that only want Linear issues to create HubSpot tickets, not the other way around. The rest of this tab appears once the first option is on. Click Save Linear Settings when you're done.
Enable ticket creation only from Linear issue to HubSpot
New Linear issues create HubSpot tickets, but new HubSpot tickets don't create Linear issues. You can still create a Linear issue for a ticket from the app card or a workflow action.
Saving with this on turns off Enable Ticket Creation and Bidirectional Sync in General Settings. The team and project filters in General Settings still apply.
Enable one-way updates from Linear to HubSpot only
When on, changes made to a Linear issue update the linked HubSpot ticket, and changes made to the ticket don't go back to Linear. To update a Linear issue from HubSpot, use the Update Linear Issue workflow action.
Linear → HubSpot Field Mapping
Chooses which HubSpot ticket property each Linear field fills in when a ticket is created from a Linear issue. The fields you can map are Title, Description, Estimate, and Due Date.
- Title → Ticket name is required and can't be changed.
- Description → Ticket description and Due Date → Close date are added by default. You can change or remove them.
- Click Add Mapping to map another field. Each field and each property can only be used once.
- If you map to a number property, a warning reminds you that the Linear value must be a number.
Label Mapping
Matches Linear labels to the options of a HubSpot multi-select or checkbox property, so a ticket shows the same labels as its issue.
- Choose the HubSpot Multi-Select Property to use.
- Choose a team in Filter Linear Labels by Team. Labels belong to teams in Linear, so mappings are saved per team.
- Click Add Label Mapping and pick a Linear label and the HubSpot option it matches.
Rows with an empty side are removed when you save.
Status Mapping
Matches Linear issue statuses to HubSpot ticket statuses (pipeline stages). Status changes only sync for statuses you map here. Click Save All Mappings when you're done.
HubSpot Pipeline
Mappings are saved separately for each ticket pipeline. Pick a pipeline to see or edit its mappings. The pipeline selected when you save is the one used for tickets created from Linear issues.
Filter Linear Statuses by Team
Each Linear team has its own statuses, so mappings are saved per team. Set up mappings for every team whose issues are linked to tickets. Issues from a team with no mappings won't change ticket status.
Status mappings
Click Add Status Mapping and pick a Linear Status and the HubSpot Status it matches. For example, map In Progress to Waiting on us and Done to Closed.
When a status changes on one side, the other side moves to the mapped status. A status with no mapping leaves the other side as it is. Rows with an empty side are removed when you save.
Account Info
Shows your account and subscription. There's nothing to save on this tab.
Account Information
The name and email on your account, and the date you signed up.
Subscription Status
Your plan, price, billing period, and status. During the free trial it also shows how many trial days are left.
- Cancel Subscription opens the cancellation page.
- Upgrade to Yearly appears on an active monthly plan.
- Resume Subscription appears if your subscription is cancelled.
- Get Started appears if you don't have a subscription yet.
How to Use the Integration
Once configured, here's how to use the different features of the integration.
Using the App Card
Access the Card
Open any HubSpot ticket and navigate to the "Apps" tab to find the "Linear Issue Converter" card.
Create New Issue
Click "Create Linear Issue" to create a new issue. Fill in the title, description, select team, project, and priority.
Link Existing Issue
Use "Link Existing Issue" to search and connect an existing Linear issue to the current ticket.
Manage Issues
Update issue status, assignees, and view issue details directly from the HubSpot interface.
Using Workflow Actions
Automated Workflow
Once configured, workflow actions run automatically based on your triggers:
- • New tickets automatically create Linear issues
- • High-priority tickets create high-priority issues
- • Category-based routing to different Linear teams
- • Custom field mapping for specialized workflows
Using Webhook Synchronization
Automatic Synchronization
Webhook sync works automatically in the background:
- • Linear status changes update HubSpot tickets
- • HubSpot comments appear in Linear issues
- • Assignee changes sync between platforms
- • Priority and label updates stay in sync
Troubleshooting
Common issues and their solutions to help you get the most out of the integration.
Common Issues
Workspace Already Connected Error
Problem: You receive an error when trying to connect a Linear workspace.
Solution: Each Linear workspace can only be connected to one HubSpot portal. Check if the workspace is already connected to another portal, or disconnect it first.
App Card Not Visible
Problem: The Linear Issue Converter card doesn't appear in HubSpot tickets.
Solution: Ensure the app is properly installed and you have the necessary permissions. Check that you're looking in the "Apps" tab of the ticket.
Workflow Action Not Available
Problem: The "Create Linear Issue" action doesn't appear in HubSpot workflows.
Solution: Make sure you've registered the workflow action from the setup page and have the automation scope enabled in your HubSpot app.
Webhook Sync Not Working
Problem: Changes in Linear aren't syncing to HubSpot or vice versa.
Solution: Check that webhook synchronization is enabled in your Linear settings and that the webhook URLs are correctly configured.
Getting Help
Check Integration Status
Visit your dashboard to check the status of your connections and troubleshoot any issues.
Go to DashboardSupport & Resources
Additional resources to help you make the most of the Linear-HubSpot integration.
Support Channels
Ready to Connect Your HubSpot Account?
Join hundreds of teams already using Atlantic DevOps to streamline their workflows.